 Loading... Please wait...
Online Store
- Catalogue
- Projects by Designer
- Dorothy Clarke
- Margaret Timmins
- Pamela Ross
- Irene Junkuhn
- Helen Dafter
- Alison Snepp
- Alison Cole
- Ana Mallah
- Angela Watson
- Ann Thomas
- Annette Johnson
- Avril Hayward
- Belinda Ingram
- Bobbie Watts
- Betsy Bee
- Bets Maas
- Bev Tully
- Brenda Sortwell
- Cate Grundy
- Catherine Howell
- Cathy Grant
- Christine Simpson
- Christine Sumner
- Dawn Elsbury
- Debbie Van As
- Deena Gillies
- Del Gordon
- Delma Moore
- Donna Cummings
- Dorothy Addlem
- Frances Langenberg
- Frances Worland
- Gladys Clough
- Helan Pearce
- Heather Lownds
- Heather McCallum
- Helen Muth
- Helen Norton
- Helen Reeves
- Igne Iplik
- Jan Bergman
- Jan Watts
- Jane Ellis
- Jennifer Bennett
- Jo Marley
- Jenny McWhinney
- Joan Walters
- Judith & Kathryn
- Judy Jeroy
- June Everett
- Karyn Mackenzie
- Kay Arbuckle
- Keith Lamb
- Kelly Jo Sayer
- Kerryn Murphy
- Liz Vickery
- Liz Walsh
- Louise Howland
- Margaret Lee
- Margot Hammonds
- Marilyn Whitebread
- Maxeen Storer
- Maryanne Dodson
- Michelle Stacey
- Michelle Stieper
- Naomi Anne
- Pamela Gurney
- Pauline Bright
- Phillipa Cox
- Rhonda Inwood
- Rosemary Walker
- Robyn Coombs
- Ruth Marshall
- Sandra Thornley
- Sibille Kreideweiss
- Stephanie Burnham
- Stephanie Coombs
- Sue Strom
- Susan Scott
- Sybil Kreidweiss
- Taetia McEwen
- Terry Jarvis
- Victoria Broad
- Vivienne Garforth
- Vivienne Holmes
- Yvonne Watts
- Projects by Publication
- A Needle Pulling Thread
- Australian Country Craft and Decorating
- Australian Homespun
- Australian Smocking and Embroidery
- Beadwork
- Beautiful Beading with Judith & Kathryn
- Beautiful Embroidery with Judith & Kathryn
- Better Homes and Gardens
- Christmas Embroidery
- Classic Stitches
- Craftwise
- Creative Embroidery and Cross Stitch
- Creative Embroidery and Cross Stitch
- Curls and Swirls
- Vol 21 No 10
- Vol 21 No 11
- Vol 21 No 12
- VOL 22 NO 10
- Vol 22 No 10
- Vol 22 No 5
- Vol 22 No 6
- Vol 22 No 7
- Vol 22 No 8
- VOL 22 No 9
- Vol 22 no3
- VOL 23 NO 7
- Vol No 10
- Vol 21 No 9
- Vol 21 No 8
- Vol 21 No 7
- Vol 21 No 6
- Vol 21 No 5
- Vol 21 No 4
- Vol 21 No 3
- Vol 21 No 2
- Vol 21 No 1
- Vol 20 No 12
- Vol 20 No 10
- Vol 20 No 9
- Vol 20 No 8
- Vol 20 No 7
- Vol 20 No 6
- Vol 20 No 5
- Vol 20 No 4
- Vol 20 No 3
- Vol 20 No 2
- Vol 20 No 1
- Vol 19 No 12
- Vol19 No11
- Vol 19 No 10
- Vol 19 No 8
- Vol 19 No 7
- Vol 19 No 6
- Vol 19 No 5
- Vol 19 No 4
- Vol 19 No 3
- Vol 19 No 1
- Vol 18 No 12
- Vol 18 No 10
- Vol 18 No 9
- Vol 18 No 5
- Vol 18 No 4
- Vol 18 No 2
- Vol 17 No 12
- Vol 17 No 9
- Vol 17 No 8
- Vol 17 No 7
- Vol 16 No 6
- Vol 16 No 5
- Vol 16 No 4
- Vol 16 No 2
- Vol 15 No 11
- Vol 15 No 10
- Vol 15 No 8
- Vol 15 No 6
- Vol 15 No 5
- Vol 14 No 12
- Vol 14 No 11
- Vol 14 No 10
- Vol 14 No 9
- Vol 14 No 6
- Vol 14 No 3
- Vol 14 No 2
- Vol 13 No 10
- Vol 13 No 7
- Vol 13 No 6
- Vol 12 No 6
- Vol 12 No 4
- Vol 12 No 1
- Vol 11 No 10
- Vol 11 No 9
- Vol 11 No 8
- Vol 11 No 5
- Vol 11 No 3
- Vol 10 No 11
- Vol 10 No 10
- Vol 10 No 9
- Vol 10 No 5
- Vol 9 No 10
- Vol 9 No 8
- Vol 9 No 7
- Vol 9 No 4
- Vol 9 No 3
- Vol 9 No 1
- Vol 8 No 11
- Vol 8 No 10
- Vol 8 No 5
- Vol 8 No 4
- Vol 8 No 3
- Vol 8 No 1
- Vol 7 No 9
- Vol 7 No 8
- Vol 7 No 6
- Vol 7 No 5
- Vol 7 No 4
- Vol 7 No 2
- Vol 6 No 10
- Vol 6 No 8
- Vol 6 No 7
- Vol 6 No 5
- Vol 6 No 3
- Vol 6 No 1
- Vol 5 No 6
- Vol 5 No 5
- Vol 5 No 4
- Vol 5 No 2
- Vol 4 No 3
- Vol 3 No 3
- Vol 1 No 1
- Elegant Ribbon Embroidery
- Embroidery Canada
- Handmade
- Igne Iplik
- Inspirations
- Meins et Merveilles
- Needlecraft
- Patchwork & Stitching
- Sew Beautiful
- Stitch UK
- On Sale
Popular Brands
Our Newsletter
- Home
- Learn How to...Use Art Silk
- Use Sadi Threads
- Laid Technique and Couching
Laid Technique and Couching

Laid Technique and Couching
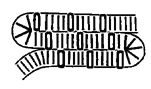
Laid Technique
Draw horizontal lines across your pattern. Take a length of sadi, hold across top line and kink with scissors tips to mark length required.
Cut sadi according to this length. Thread straw needle with Art Silk (waxing first). Bring needle up through reverse side of fabric at the left side of line.
Pick up sadi with needlepoint, then pass needle and art silks through the central tube of sadi (the needle and thread pass through the sadi as if the sadi were a long bead). Bring needle down at the right hand side of line so the sadi lies flat on the surface of the fabric. Take needle and thread through to the wrong side. NOTE: The sadi itself does not pull through the fabric! Bring needle up again at left side of next line, slightly below the laid length of sadi. You may wish to alternate lines of sadi with lines of art silk. If so, your next stitch is simply a long stitch with the art silk.
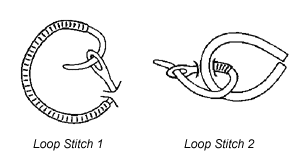
Bead Techniques
Sadi may be cut into lengths & stitched down as one would stitch down a bead. You can make the sadi stand up from the fabric in loops by using a longer length of sadi and a shorter stitch with art silk thread.

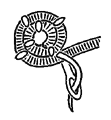
Couching
Position and lay sadi thread in place on the right side of fabric. Thread crewel needle with art silk or metal thread (depending on desired effect). Take small stitches over the sadi, at right angles to the direction of the sadi. Couching stitches must be firm enough to hold the sadi in place, but not so firm as to kink the sadi and may either slip between coils or sit on top.